
Even when a micropipette is functioning correctly, handling can change the volume delivered: how the plunger is pressed, how deep the tip goes, how warm the pipette and liquid are, and whether the technique suits the liquid. This guide explains how to use a micropipette with the two standard techniques, forward pipetting and reverse pipetting, when each is the better choice, and which handling errors have the largest measured effect on the volume you actually deliver. It covers manual air-displacement (air-cushion) pipettes. For the wider picture of pipettes, dispensers and controllers, see the pipetting and liquid handling guide.
Quick answer: In forward pipetting you press the plunger to the first stop, aspirate, then dispense and press on to the second stop to blow out the last drop. It is the standard technique for water and aqueous solutions. In reverse pipetting you press to the second stop before aspirating, so the tip draws up extra liquid, then dispense only to the first stop and discard what is left. It is recommended for viscous, volatile and foaming liquids [1][6], but with plain aqueous solutions it can deliver more than the set volume [1]. Whichever technique you use, pre-wet the tip, avoid unnecessary temperature differences between pipette, tips and liquid, immerse the tip only a few millimetres, hold the pipette vertical, and use a smooth, consistent plunger rhythm.
1. How an Air-Displacement Micropipette Works
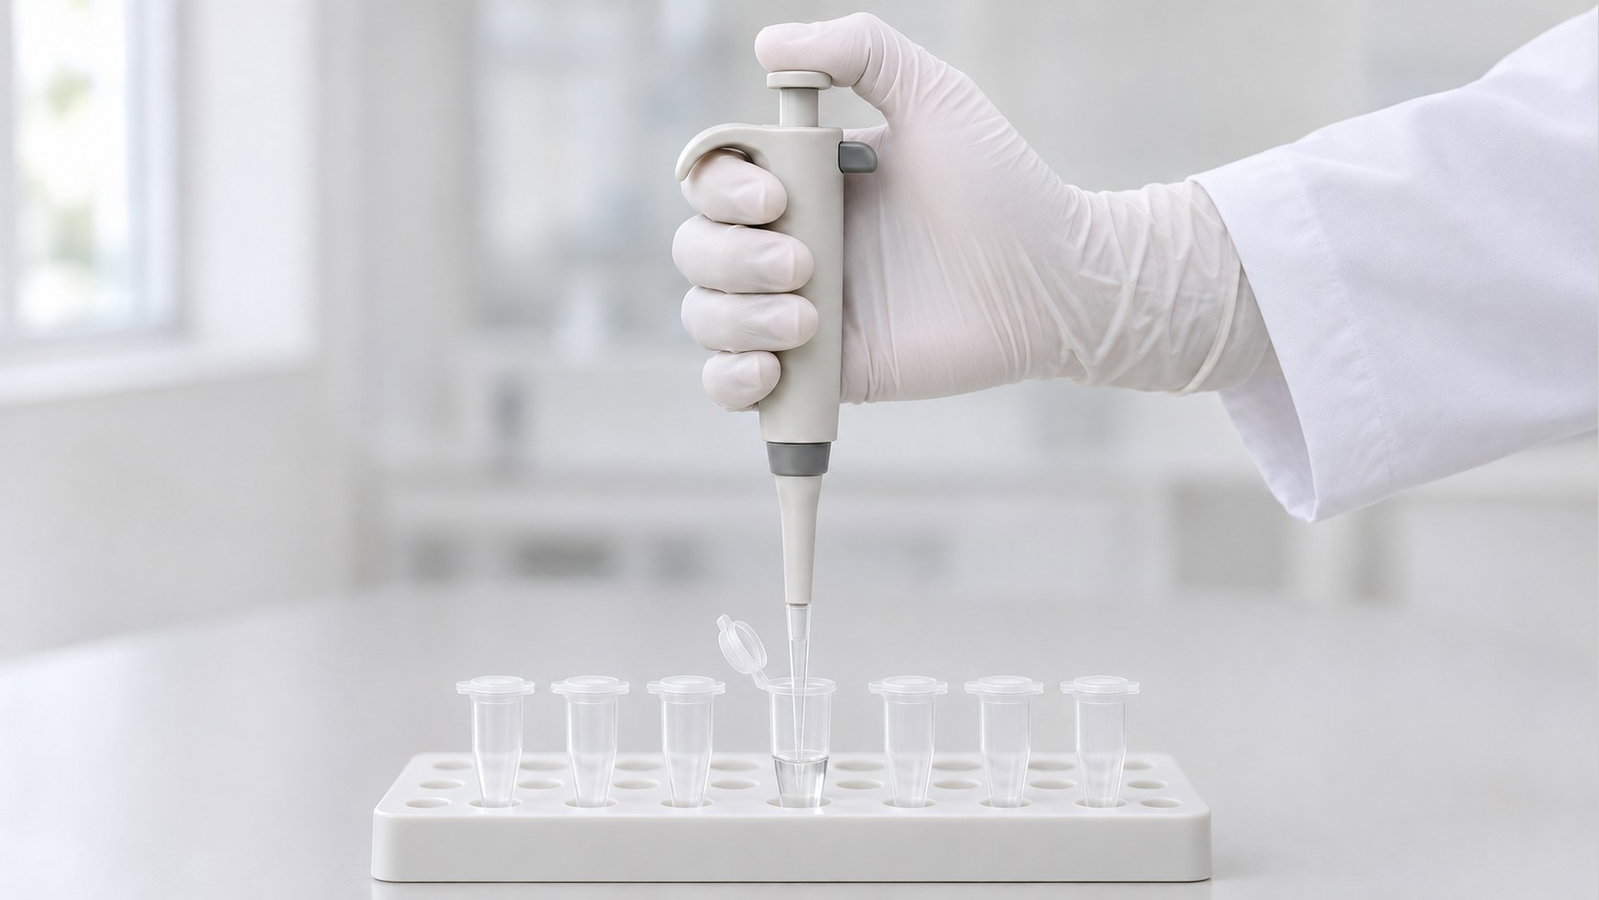
An air-displacement micropipette never touches the liquid with its piston. Between the piston and the liquid in the tip sits a small pocket of air, which ISO 8655-1 calls the dead air volume or air cushion [2]. When you release the plunger, the piston rises, the air cushion expands, and liquid is drawn into the tip. When you press the plunger, the air pushes the liquid back out. ISO 8655-2 classes these instruments as Type A pipettes, as distinct from Type D (positive-displacement) pipettes, in which the piston or plunger is in direct contact with the liquid [3]. This article deals only with Type A.
Because the liquid is moved by a cushion of air, anything that changes the volume of that air changes the volume you deliver. Air expands when it warms, contracts when it cools, takes up vapour from the liquid, and is stretched a little by the weight of the liquid hanging in the tip [4][5]. Most of the errors in section 5 trace back to this.
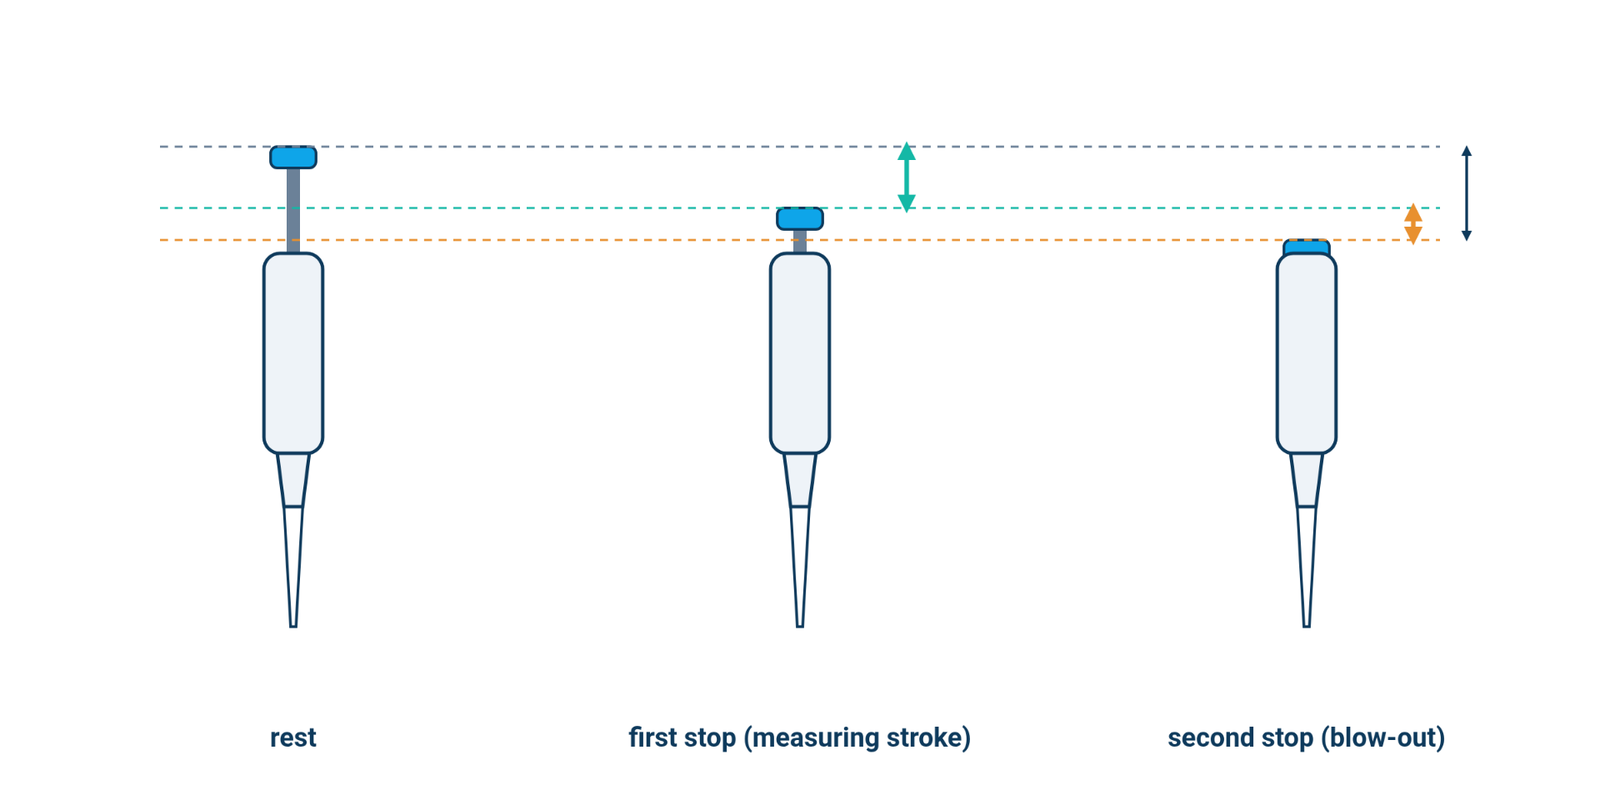
Manual air-displacement pipettes typically have two plunger stops [6]:
- First stop. The end of the measuring stroke. Pressing from rest to the first stop displaces the set volume.
- Second stop. A further stroke beyond the first stop. ISO 8655-2 notes that some Type A pipettes have "an extra air volume that can be used to expel the last drop of liquid" [3]. This is the blow-out.
The two techniques below use the same two stops in a different order. Check your pipette's instruction manual for how its stops feel and work; ISO 8655-2 states that manufacturers' manuals should contain detailed and specific information about proper operation [3].
2. Forward Pipetting, Step by Step
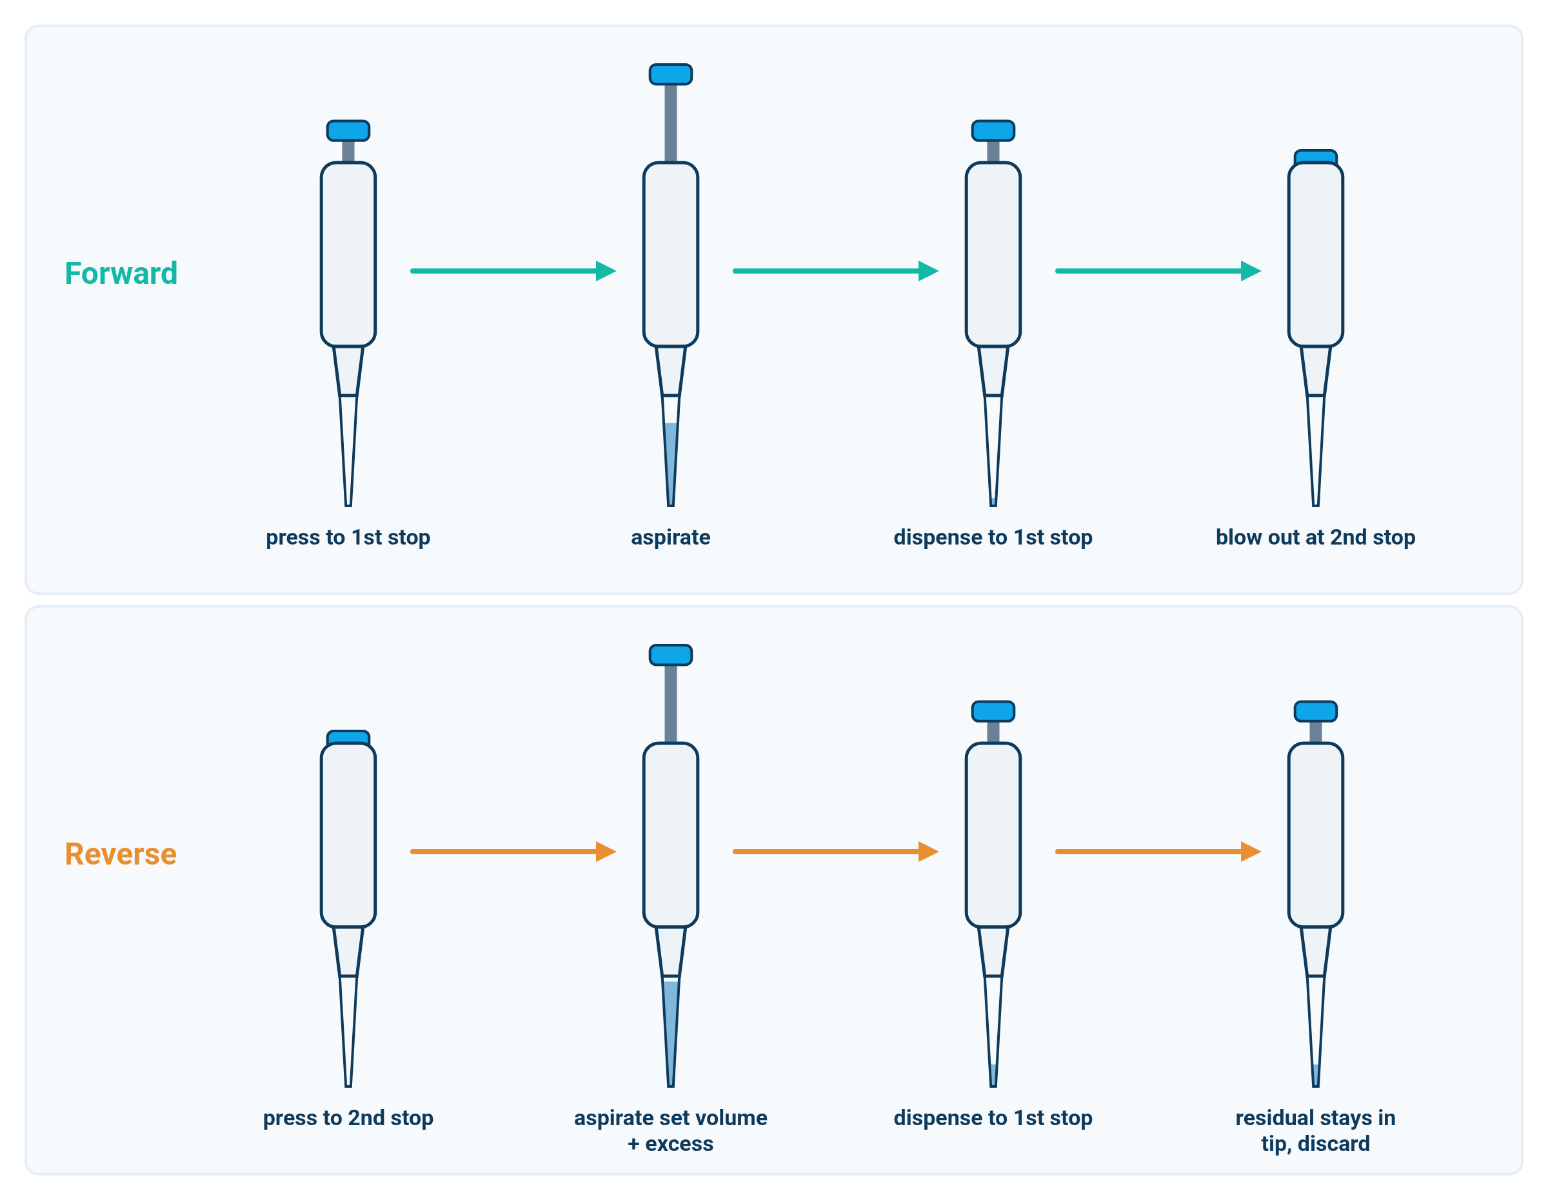
ISO 8655-2 states that pipettes are typically operated using forward pipetting [3], and gravimetric calibration with aqueous test liquid is carried out in forward mode [1]. Use it for water, buffers and most aqueous solutions.
- Set the volume and attach a tip firmly.
- Pre-wet the tip. Aspirate and dispense the set volume back into the source liquid at least three times before the first measured aspiration [1].
- Press the plunger to the first stop while the tip is out of the liquid.
- Immerse the tip just below the surface, a few millimetres deep, with the pipette vertical (section 5).
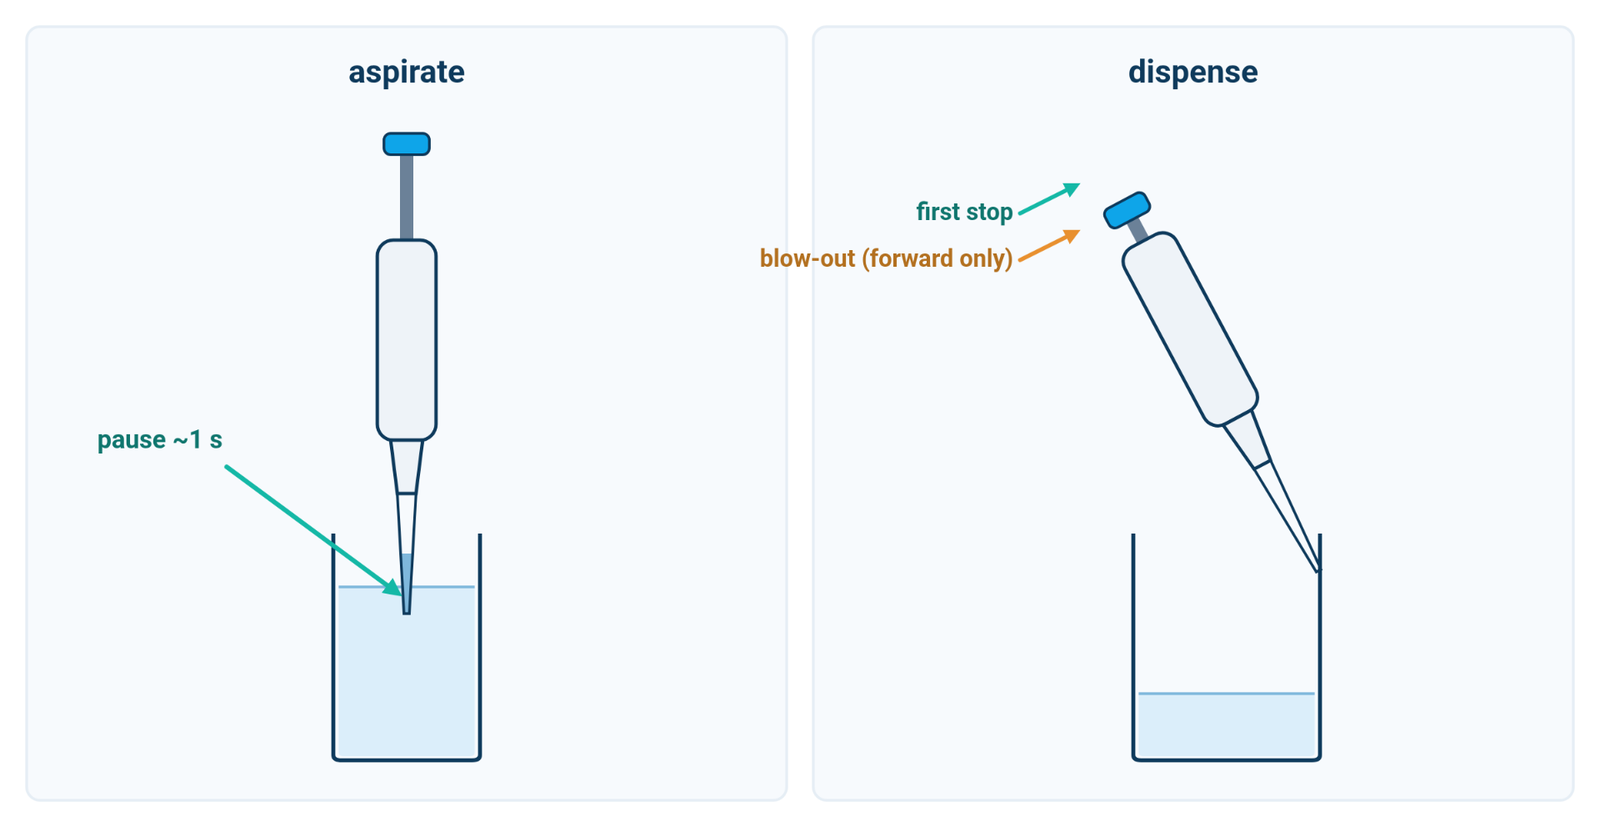
- Release the plunger slowly and smoothly to aspirate. Pause for about a second with the tip still in the liquid, then withdraw it without touching the vessel wall [1].
- Dispense. Touch the tip to the inner wall of the receiving vessel and press smoothly to the first stop.
- Blow out. Press on to the second stop to expel the remaining drop, then slide the tip up the wall and out.
- Release the plunger only after the tip is out of the liquid, so nothing is drawn back up.
In forward pipetting, the measuring stroke delivers the intended aliquot and the blow-out helps clear residual liquid from the tip [6].
3. Reverse Pipetting, Step by Step
Reverse pipetting aspirates the set volume plus an excess, then leaves that excess behind in the tip [6][7].
- Set the volume and attach a tip.
- Press the plunger to the second stop while the tip is out of the liquid.
- Immerse the tip a few millimetres below the surface, pipette vertical.
- Release the plunger slowly to aspirate. The tip now holds the set volume plus the blow-out volume. Pause briefly, then withdraw the tip.
- Dispense to the first stop only. This delivers the volume defined by the measuring stroke; the actual delivered volume can still differ from the setting. Some liquid stays in the tip.
- Do not dispense the residual into the sample. One application note states that this remaining liquid "should not be dispensed" [6]; it is discarded with the tip, or into waste.
Why it helps: the blow-out stroke, which pushes air through the orifice, is never used during delivery. The excess acts as a reservoir that evens out successive volumes and offsets liquid retained on the tip wall, and because no air is blown through the liquid at the end of the stroke, foaming is less likely [4][6].
What it costs: residual liquid is discarded with the tip, and switching from forward to reverse mode can change the delivered volume relative to a forward-mode calibration. In a 2014 study of technique errors, using reverse mode with aqueous solutions led to "significant overdelivery of up to 2.3%" relative inaccuracy and added up to 0.7% CV [1]. A 2018 Japanese study found that forward pipetting tended to give a lower and reverse pipetting a higher volume than the theoretical value, and that forward pipetting was the more accurate overall; its authors recommend forward pipetting as the default and reverse pipetting for viscous samples when precision matters [8].
4. Forward vs Reverse Pipetting: Which Technique for Which Liquid?
The choice depends on how the liquid behaves in an air-cushion tip. The table summarises guidance from the standard and published technique literature; it is general guidance, not a property of any particular pipette.
| Liquid behaviour | Examples | Usual technique | Extra precautions |
|---|---|---|---|
| Aqueous, low viscosity | Water, buffers | Forward [1][3][8] | Pre-wet; standard technique as in section 2 |
| Viscous | Glycerol and other high-viscosity liquids | Reverse [4][6][8] | Slow aspiration and dispensing [4][5] |
| Volatile (high vapour pressure) | Ethanol, acetone, acetonitrile | Reverse, after thorough pre-wetting [1][9] | Pre-wet repeatedly to saturate the air cushion [5][9] |
| Foaming or surface-active | Protein and surfactant solutions | Reverse [5][6] | Very slow aspiration and dispensing [5]; no blow-out through the liquid [6] |
| Density far from water | Concentrated sulfuric acid (denser); methanol (lighter) | Set by the liquid's other properties (viscosity, volatility); density itself adds a systematic offset [5] | Check gravimetrically; adjust only as the manufacturer allows [3] |
Viscous liquids flow slowly and leave a film on the tip wall that drains after the main volume [4]. In one manufacturer note, a pipette adjusted for glycerol showed individual CV values of 0.69% to 1.15% in forward mode and 0.27% to 0.50% in reverse mode; the same note points out that reverse pipetting also raises the delivered volume because of the higher liquid level in the tip [4]. Slower plunger movement gives the film time to drain.
Volatile liquids evaporate into the air cushion as soon as they enter the tip. The air expands and pushes liquid out, which is why solvents drip from the tip [4][9]. Pre-wetting saturates the air with vapour: one application guide advises rinsing the tip at least five times [9], and another note advises pre-wetting for a minute or longer with solvents, adding that the delivered volume will still be lower than nominal [5]. Reverse pipetting then limits the effect of any remaining evaporation [9].
Foaming and protein-containing liquids coat the tip wall and form bubbles when air is pushed through them at the blow-out. In a study with 1% bovine serum albumin (BSA) at small volumes, reverse pipetting reduced imprecision by more than 50% compared with forward pipetting [6].
Dense liquids load the air cushion differently from water. For a 1000 µL nominal setting, one note calculates a deviation of +0.2% for methanol and −0.78% for concentrated sulfuric acid, with larger relative errors at small volumes [5]. ISO 8655-2 allows some pipettes to be re-adjusted by the user for liquids that differ from water, provided the design prevents unintentional readjustment and the change is clearly indicated [3]. Do this only as your pipette's manual describes; otherwise, measure the offset and account for it.
When the required volume accuracy is uncertain, compare the techniques using a validated procedure suited to the liquid; a gravimetric check needs appropriate density correction, evaporation control and safe handling. Calibration and gravimetric checks are covered in the pipette calibration guide.
5. The Pipetting Errors That Matter
ISO 8655-1 separates two kinds of error. Systematic error is the deviation of the mean delivered volume from the nominal or selected volume, and relates to accuracy. Random error is the variation of the delivered volumes around their mean, and characterises precision; expressed as a percentage of the mean delivered volume it is the coefficient of variation (CV) [2]. Technique errors can push either one. The figures below come from controlled studies under the stated conditions; they show the size of each effect, not limits for any pipette.
Skipping pre-wetting
A fresh, dry tip lets liquid evaporate into the air cushion during the first aspirations. In one study a 20 µL pipette used in a laboratory at 30% relative humidity delivered on average 1.3% less without pre-wetting than with three pre-wetting cycles [1]. Without pre-wetting, the delivered volume creeps upward over a series until the air in the tip reaches equilibrium [5]. Pre-wetting also improved accuracy in the 2018 study [8]. Pre-wet every new tip.
Temperature differences
The air cushion is sensitive to temperature, and what matters is the difference between pipette, tip, liquid and room, not the absolute temperature [5]. For the most accurate work, one best-practice study recommends equilibrating pipette, tips and liquid for at least 2 hr to within 0.5 °C of ambient [1]. In the same study, tips cooled to 4 °C caused underdelivery of up to −1.9% and 1.2% CV, and progressive warming of the pipette barrel by the hand produced −1.1% and 0.8% CV [1]. In the 2018 study, a sample much colder than room temperature also affected accuracy [8]. Put the pipette down in a stand between series instead of holding it [7], and allow cold or warm samples to settle wherever the protocol permits.
Immersion depth
ISO 8655-1 defines immersion depth as the depth of the tip orifice below the liquid surface [2]. Too shallow, and air can be drawn in; too deep, and liquid clinging to the outside of the tip is carried over, while the extra hydrostatic pressure pushes more liquid into the tip [1][10]. A 2014 article, citing ASTM E1154-89(2008), reports immersion depths of 2–3 mm for volumes of 1–100 µL, 2–4 mm for 101–1000 µL, and 3–6 mm above 1 mL [1]. Immersing at 1 mm or 8 mm instead increased imprecision by up to 2.2% CV [1]. Portugal's national metrology institute (IPQ) uses a normal immersion depth of 3 mm and reported lower volumes at 1 mm and higher volumes at 6 mm [10][11].
Pipette angle
Aspirate with the pipette vertical. Tilting it during aspiration draws in more liquid, because the hydrostatic conditions in the tip change [10]. For dispensing, touch the tip against the vessel wall: the IPQ work uses an angle of about 30° to 45° [10], and the best-practice study suggests 45° [1]. The IPQ group reported that delivered volume can be lower than expected when the delivery angle is larger than 60° [11].
Plunger speed, rhythm and pause
Aspirating too quickly can pull in air bubbles [10], and in the IPQ measurements faster handling gave lower delivered volumes [10]. Very slow aspiration is not the answer either: it produced underdelivery of up to −1.1% and up to 0.7% CV in one study [1]. Aim for a smooth, consistent stroke at the same speed every time [7]. After aspirating, pause for about 1 second with the tip still immersed so the liquid in the tip can settle. Withdrawing too early produced errors of up to −0.6% and 0.4% CV; leaving the tip in the liquid far too long produced up to −2.3% and 1.6% CV [1]. Never let the plunger snap back [12].
Touching and wiping the tip
Do not drag the tip along the wall of the source vessel after aspirating; doing so produced up to −0.7% and 0.6% CV in one study [1]. Wiping the outside of the tip with a tissue is common but risky, because it is easy to wick liquid out of the orifice: in the same study, tip wiping introduced over 2.3% CV and underdelivery of up to −1.3% [1]. If a droplet clings to the outside, touch it off on the vessel wall instead.
Tip fit
The tip is part of the measuring system. A poor seal between tip and pipette cone lets air leak and changes the delivered volume. Technique studies recommend using the tips specified by the pipette's manufacturer and checking that any alternative tip fits and performs well [1]. In the IPQ comparison, a tip from another brand gave +1.48% at 10 µL, which the authors attribute to a larger displaced air volume than with the manufacturer's tip [10]. If you change tips, check performance gravimetrically.
Using the wrong part of the volume range
An adjustable pipette performs best at or near its nominal (maximum) volume [1]. One review advises against setting a pipette to less than 10% of its maximum volume [7], and the 2018 study found the best accuracy and reproducibility with a pipette whose capacity was close to the volume taken [8]. Product specifications show the same pattern. For the Hipette, ACS Material lists these values for the single-channel 0.5–10 µL range:
| Test volume (µL) | Systematic error (µL) | Systematic error (%) | Random error (µL) | Random error (%) |
|---|---|---|---|---|
| 10 | ±0.10 | ±1.0 | ±0.04 | ±0.4 |
| 5 | ±0.08 | ±1.5 | ±0.04 | ±0.8 |
| 1 | ±0.03 | ±2.5 | ±0.02 | ±1.8 |
The listed absolute error values are smaller at 1 µL, while the specified percentage errors are largest at that test volume. The table reproduces ACS Material's values without recalculating them; they are not ISO 8655 maximum permissible errors, and the technique used is not specified. How to pick a range for a given volume is covered in the guide to choosing a pipette volume range.
Handling habits
Never lay a pipette down or turn it upside down with liquid in the tip, because liquid can run up into the piston [12]. Never turn the volume adjuster beyond the pipette's marked range [12].
Why small errors add up
Technique effects can combine, but the cited study did not directly test combinations. Its authors state that compounded errors "can easily reach 12%" and cite field surveys suggesting that larger combined errors occur [1]. Training and periodic checks are the remedy. ASTM E1154 covers operator training and qualification as well as the apparatus itself [13], and ISO 8655-1 states that its test procedures are intended to be carried out by trained personnel [2].
6. Hipette: What ACS Material Specifies
The ALab™ Hipette mechanical pipette is a manual adjustable pipette. ACS Material lists single-channel models ("Ten models, 0.1–10000 µL"), 8- and 12-channel versions ("Five volume ranges, 0.5–300 µL" each) and 16-channel (1–20 and 5–100 µL). Listed features that relate to the handling points above:
- Volume range identification. "Different colored caps correspond to different volume ranges."
- Volume setting. A volume lock design that "Prevents accidental changes in volume", and a 4-digit display.
- Plunger and ejection. ACS Material says the pipette "is lightweight with a light press force. Ejecting the tip requires minimal effort, and the press stroke is of moderate length."
- Tip attachment. An elastic nozzle function: "No need for repeated tapping; a light touch can securely attach the pipette tips". No specific tips are named; use the tips specified for the pipette.
- Calibration reference. ACS Material lists "Calibration reference: ISO 8655-2" and notes: "User calibration should refer to the industrial standard ISO8655-2."
- Error specifications. Systematic and random error at three test volumes, as in the 0.5–10 µL example in section 5.
ACS Material does not describe pipetting modes for the Hipette. Forward and reverse pipetting, as set out above, are general two-stop techniques for air-displacement pipettes; follow the instrument's manual for its operation.
7. Checklist
Before each series:
- Choose a pipette whose range puts your volume near the top of the range.
- Equilibrate pipette, tips and liquid where the protocol permits; avoid unnecessary temperature differences.
- Decide on forward or reverse pipetting from the liquid type (section 4).
- Attach a tip firmly and pre-wet it.
For every aspiration and dispense:
- Pipette vertical; tip a few millimetres below the surface.
- Smooth, consistent plunger speed; pause about a second before withdrawing.
- Do not touch the source vessel wall or wipe the tip.
- Dispense against the vessel wall; blow out only in forward pipetting.
- Release the plunger with the tip out of the liquid; never lay the pipette down with liquid in the tip.
8. Frequently Asked Questions
Is reverse pipetting more accurate than forward pipetting?
Not in general. For water and aqueous solutions, forward pipetting is the standard technique, and reverse pipetting can deliver more than the set volume [1][8]. Reverse pipetting can improve repeatability for certain viscous or foaming liquids [4][6]; for volatile solvents it is recommended mainly to help control evaporation-related dripping [9].
What is the second stop on a pipette for?
It is the blow-out: an extra stroke beyond the measuring stroke that expels the last drop of liquid from the tip [3]. Forward pipetting uses it to deliver; reverse pipetting uses it only to load the excess before aspiration.
Should the liquid left in the tip after reverse pipetting go into the sample?
No. The residual is not part of the delivered volume; discard it with the tip or into waste [6].
How many times should I pre-wet a tip?
About three times for aqueous liquids [1], and more for volatile solvents: one guide advises at least five rinses [9]. Pre-wet each new tip.
Do I need a special pipette for reverse pipetting?
The technique uses the first and second stops of a standard two-stop air-displacement pipette [6][7]. Check your pipette's manual to confirm how its stops work.
How deep should the tip go into the liquid?
Only a few millimetres. A 2014 article citing ASTM E1154-89(2008) reports 2–3 mm for 1–100 µL, 2–4 mm for 101–1000 µL, and 3–6 mm above 1 mL [1].
9. Keep Exploring the Pipetting Hub
- Pipetting and liquid handling guide: pipettes, dispensers and controllers from microliters to milliliters.
- Choosing a pipette volume range: why a pipette works best near the top of its range.
- Pipette calibration and ISO 8655: calibration vs adjustment and the gravimetric check.