Ask what a 3D printed part will look and feel like and you get a different question from “how accurate is it” — a part can be dimensionally excellent and still show layer lines you can catch with a fingernail, or feel silky while missing a tolerance.1,2 This guide is about the texture half of that pair: where layer texture actually comes from, what each process family’s surfaces genuinely look like as-printed, a plain-language finish ladder from visibly layered to mirror-capable, and which finishing steps move a part up that ladder. Its sibling — our precision and tolerance guide — handles the dimensional half; this one handles what your eyes and fingers meet.
Finish is not tolerance
Surface finish and dimensional accuracy are cousins, not twins. Finish describes micro-scale texture — the pattern your fingertip reads; tolerance describes macro-scale correctness — whether features land where the drawing says.1 They interact (heavy texture complicates measurement, and machining fixes both at once) but they are specified, produced, and verified separately, and conflating them is how parts get over-processed. Specify texture where hands, eyes, seals, or flow touch the part; specify tolerance where parts meet other parts.2
Where texture comes from
Three mechanisms dominate. The staircase: any surface tilted away from vertical is built as discrete steps of layer height, and the shallower the tilt, the wider each visible step — the classic stair-stepping that makes gentle domes and low-angle lids the most textured faces on a build.3 Down-skin physics: in powder-bed metal, downward-facing surfaces solidify against loose powder rather than solid material, picking up adhered particles and dross that make down-skins measurably rougher than up-skins — a well-studied effect that orientation planning works around.4,5 Process signature: beyond geometry, each family leaves its own fingerprint — parameter choices measurably shift metal surface quality, extrusion leaves seams, powder processes leave a granular matte — which is why the family, not just the settings, decides the starting texture.6
As-printed, family by family
FDM / extrusion: visibly layered — continuous roads of material with a seam per perimeter; texture strongest on shallow slopes, tightest on vertical walls.1,2 Resin (SLA/DLP): the smoothest polymer start — fine layers and smooth visual surfaces that may need little cosmetic work for many display applications, which is why fine-featured visual parts default to the vat. True optical performance is a separate conversation about transparency, cure, coating, and polish.7 Polymer powder bed (SLS/MJF): a comparatively uniform, slightly granular matte across most orientations — free of the localized contact scars that separately printed supports leave, with no dominant seam — that dyes evenly and hides handling wear.8 Metal LPBF: a rough-cast look as-printed: blasted-metal texture on up-skins, rougher down-skins, and witness marks where supports came off — expected, planned-for by orientation and support strategy, and finished where it matters.4,5 Ceramic (binder-based, sintering-densified): fired surfaces are route-, material-, orientation-, and finishing-dependent — often a fine matte, though layer, particle, or support-contact signatures can persist after densification; sealing and bearing interfaces are diamond-ground after firing, and the fired-surface story is part of our guide to how ceramic 3D printing works.9 The polymer trade space across these starting points is mapped in our FDM vs SLA vs SLS comparison.
The finish ladder: four plain-language tiers
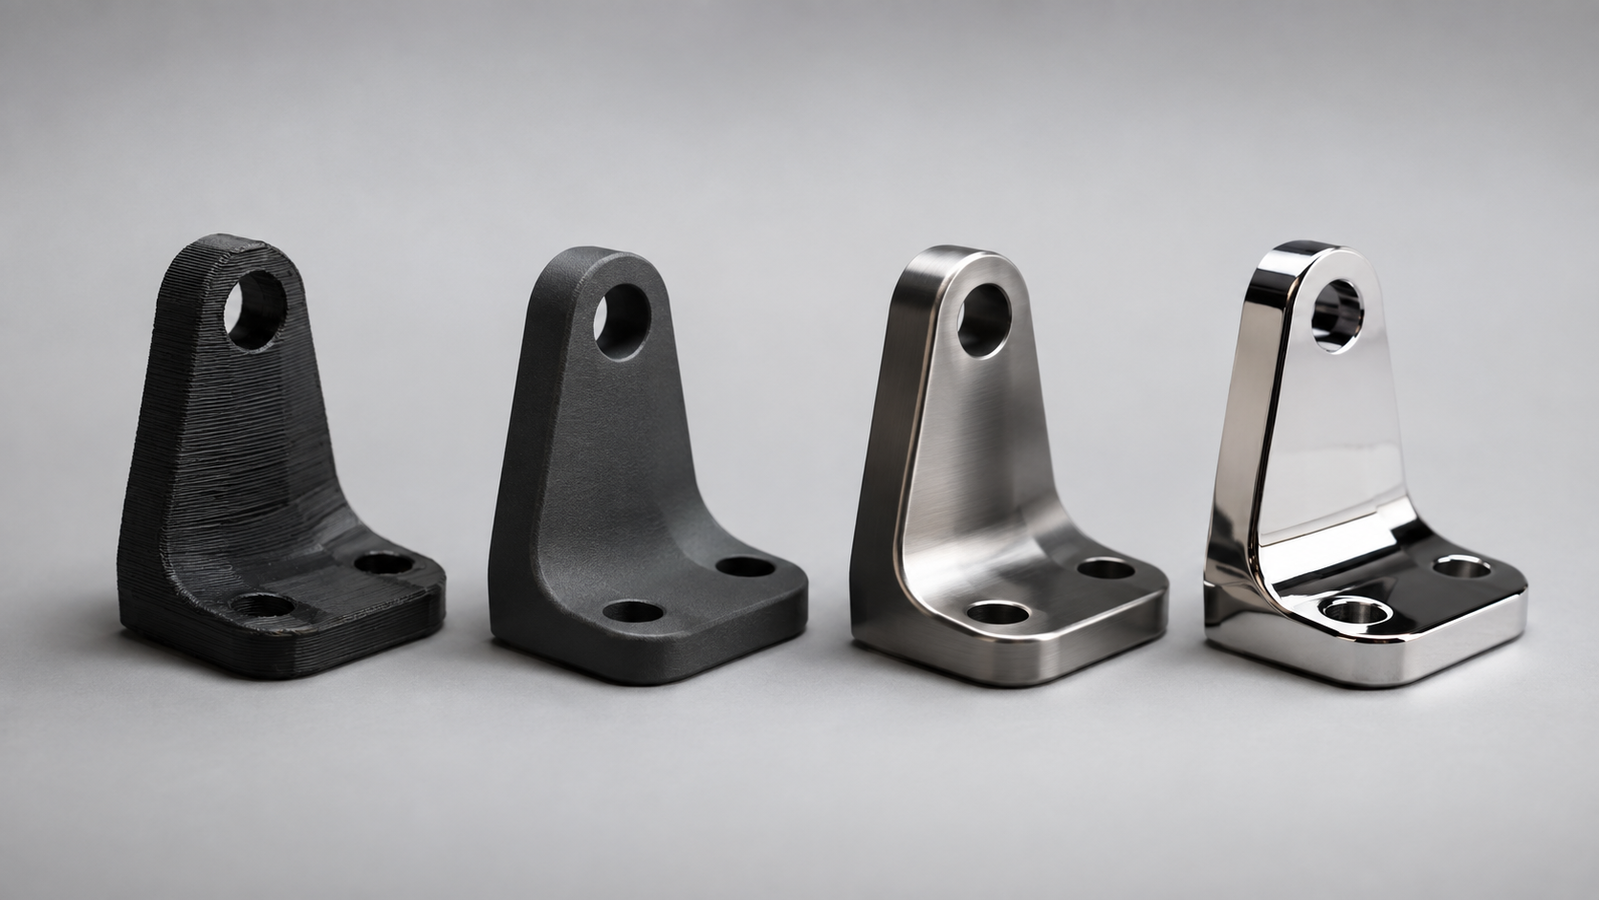
Numbers on datasheets vary by machine, material, orientation, and measurement method, so for planning purposes a qualitative ladder communicates better than a decimal.1 Visibly layered: texture obvious to eye and fingernail; fine for form checks, jigs, and hidden parts. Matte textured: uniform, intentional-looking surface; the natural home of powder-bed parts and blasted metal. Smooth: layer texture no longer catches the fingernail; vat resin starts here, and machining or thorough finishing brings other families here. Mirror-capable: reflective after deliberate polishing or a suitable coating — lapping prepares flat, low-roughness faces but does not by itself guarantee a mirror — a budgeted operation on any family. Each part face can sit on a different rung, and specifying by face is exactly how professional RFQs do it.
Interactive: finish ladder explorer
Pick a process family and a finishing level to see where a typical surface lands on the ladder — and what that step involves.
Moving up the ladder
Finishing is a menu, and each item buys smoothness with something else. Tumbling / vibratory finishing knocks down peaks across whole batches cheaply, at the price of softened edges and corners. Bead blasting unifies texture into an even matte and reduces minor witness marks — the default cosmetic step for powder-bed and metal parts. Machining is the decisive move: it replaces the printed surface entirely on the faces that matter, delivering smoothness and tolerance together, and it is standard practice on metal AM parts wherever fits and finishes are critical — sequenced with the rest of the post-processing chain.10 Lapping improves flatness and fine surface texture, while polishing or coating provides the reflective finish where required; coating, painting, and vapor smoothing (on compatible polymers) change chemistry as well as texture.7 The professional habit: finish by face, not by part — paying for mirror on surfaces nobody touches is the most common finishing overspend.
When as-printed is enough — and how to verify
A large share of functional parts ship on the matte rungs: enclosures, brackets, ducting, prototypes, powder-bed nylon assemblies — surfaces whose job is mechanical, not visual.2,8 The decision rule is function: if a face meets a seal, a bearing, fluid flow, or a customer’s hand — or if fatigue initiation, friction and wear, cleanability, coating adhesion, corrosion exposure, biomedical contact, or optical performance ride on it — specify its rung explicitly; otherwise let the process default stand and spend the budget where it functions. For verification, standardized test artefacts include surface-texture features precisely so a machine-and-workflow combination can demonstrate what it produces — ask your provider what their system shows rather than reading a datasheet as a promise.11 For fired-ceramic interfaces — the strictest finish conversation in the set — our ceramic 3D printing service scopes grinding and lapping at quote time, and the full seven-family context lives in our 3D printing overview.
FAQs
1. Which 3D printing process has the best surface finish?
As-printed, vat photopolymerization (SLA/DLP) typically starts smoothest; powder beds give a uniform matte; extrusion shows visible layers; metal prints rough-cast. With compatible material, geometry, finishing method, and stock allowance, most families can reach a smooth functional finish on accessible faces — at a cost.7,1
2. Why are downward-facing metal surfaces rougher?
Down-skins solidify against loose powder instead of solid material, picking up adhered particles and dross — a documented effect that orientation and support planning work around, with finishing where it matters.4,5
3. How do I get rid of layer lines?
Move up the ladder: tumbling or blasting softens them, machining removes them on critical faces, polishing or coating erases them visually. Vapor smoothing works on compatible polymers. Each step trades cost, time, or edge sharpness.10,7
4. What surface finish should I specify?
Specify by face, in plain tiers (visibly layered / matte / smooth / mirror-capable) or by agreed measurement where it is functional — and only where contact, sealing, flow, or appearance demands it. Everything else keeps the process default.1
5. Does surface finish affect accuracy?
They are related but separate: heavy texture complicates measurement and machining improves both at once, yet a part can be accurate and textured, or smooth and out of tolerance. The dimensional half of the story is our precision and tolerance guide.1,11
References
This article is provided by ACS Material LLC for educational purposes and describes surface finish in additive manufacturing qualitatively. As-printed texture and achievable finishes vary with machine, material, parameters, orientation, geometry, and measurement method; the four-tier ladder is a planning vocabulary, not a measured roughness scale, and specific requirements should be agreed with your provider by face, verified on standardized artefacts or project coupons. The interactive explorer is a qualitative teaching aid.